在我们使用传统的spring开发一个web应用程序通常会想到一些基本的需要:
- web.xml文件(配置springMVC的DispatcherServlet,各种过滤器等等);
- 启用了springMVC的spring配置文件;
- mybatis等数据库配置文件等。
以上的这些仅仅只是进本的需求,无论是开发一个大型项目或者只是一个hello word程序,都需要配置几乎同等的配置文件,既然这些都是通用的东西,那有什么东西可以把这些给自动配置了呢?这时候springboot的自动配置功能就派上用场了,springboot会为这些常用的配置进行自动配置。这些自动配置涉及很多方面,比如:java持久化api,各种web模板,springMVC等等。
起步依赖
平时我们使用maven创建一个web项目的时候,常常需要想项目需要哪些包,以及包的版本。但是在springboot创建web应用的时候,你只需你只需添加springboot的Web起步依赖(org.springframework.boot:spring-boot-starter-web)。它会根据依赖传递把其他所需依赖引入项目里突。
而其它你需要的功能,你只需要引入相关的的起步依赖即可。
内嵌Servlet容器
其实springboot并不是一个应用服务器,它之所以可以运行web应用程序,是因为其内部已经内嵌了一个Servlet容器(Tomcat、Jetty或Undertow),其运行原理是把web应用直接打包成为一个jar/war,然后这个jar/war是可以直接启动的,不需要另外配置一个Web Server。相关的embed类就是它的依赖包。
使用Spring Initializr构建springboot应用程序
本文使用的是intellij idea中的Spring Initializr工具创建springboot应用程序。
菜单栏中选择File=>New=>Project..,步骤大概是选择构建的工程类型,如:maven,Gradle;language的选择;选择Spring Boot版本和起步依赖包等等。具体创建步骤这里就省略了。
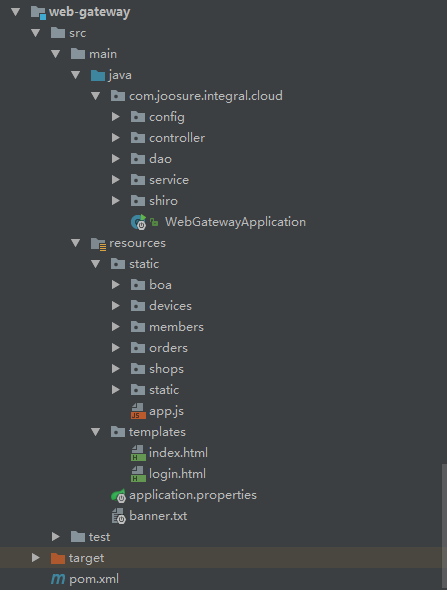
spring boot项目结构如图所示,整个项目结构遵循了maven项目的布局,主要的应用程序代码位于src/main/java目录里,资源都在src/main/resources目录里,测试代码则在src/test/java目录里。不同的是,web页面模板移到templates了,我的项目现在主要用thymeleaf模板作为web页面。
在结构图你会发现一些与springboot密切项目的文件:
- WebGatewayApplication.java:应用程序的启动引导类(bootstrap class),也是主要的Spring配置类;
- application.properties:用于配置应用程序和Spring Boot的属性;
- ReadingListApplicationTests.java:一个基本的集成测试类。
- banner.txt:spring boot应用程序启动时加载的文件。
启动引导Spring
前面我们看到的WebGatewayApplication.java在springboot应用程序中主要有两个作用:配置和启动引导。而也是Spring的主要配置类。虽然springboot的自动配置免除了很多Spring配置,但你还需要进行少量配置来启用自动配置。
程序清单:
package com.crm;
import org.springframework.boot.SpringApplication;
import org.springframework.boot.autoconfigure.SpringBootApplication;

@SpringBootApplication  // 开启组件扫描和自动配置
public class WebGatewayApplication {
    public static void main(String[] args) {
    	SpringApplication.run(WebGatewayApplication.class, args);// 启动引导应用程序
    }
}
配置应用程序属性
用Spring Initializr生成的application.properties文件只是一个空文件,它可以删除完全不影响应用程序的运行,但是,如果你想修改应用程序的属性,你就得在里面配置相关属性了,比如你在里面配置了server.port=9010,嵌入是的tomcat服务器的监听端口就不是默认的8080了,变成了9010。而且这个属性文件是自动被加载的。
这是我的项目application.properties属性配置:
###### MySQL配置
spring.datasource.name=test
spring.datasource.url=jdbc:mysql://localhost:3306/crm?characterEncoding=UTF8
spring.datasource.username=zch
spring.datasource.password=123456
spring.datasource.driver-class-name=com.mysql.jdbc.Driver
spring.datasource.filters=stat
spring.datasource.maxActive=20
spring.datasource.initialSize=1
spring.datasource.maxWait=60000
spring.datasource.minIdle=1
spring.datasource.timeBetweenEvictionRunsMillis=60000
spring.datasource.minEvictableIdleTimeMillis=300000
spring.datasource.validationQuery=select 'x'
spring.datasource.testWhileIdle=true
spring.datasource.testOnBorrow=false
spring.datasource.testOnReturn=false
spring.datasource.poolPreparedStatements=true
spring.datasource.maxOpenPreparedStatements=20
###### mybatis
mybatis.typeAliasesPackage=com.joosure.integral.cloud.pojo.cloud
mybatis.mapperLocations=classpath:mapper/*.xml
####### thymeleaf
spring.thymeleaf.cache=false
spring.thymeleaf.check-template-location=true
spring.thymeleaf.content-type=text/html
spring.thymeleaf.enabled=true
spring.thymeleaf.encoding=UTF-8
spring.thymeleaf.excluded-view-names=
spring.thymeleaf.mode=HTML5
spring.thymeleaf.prefix=classpath:/templates/
spring.thymeleaf.suffix=.html
spring.thymeleaf.template-resolver-order=
构建过程解释
我的项目用的是maven作为构建工具,因此用Spring Initializr会生成pom.xml文件,这与创建普通的maven项目一样,代码清单如下:
<version>0.0.1-SNAPSHOT</version>
	<packaging>jar</packaging>

	<name>crm</name>
	<description>crm-system</description>

	<parent> <!-- 从spring-boot-starterparent继承版本号 -->
		<groupId>org.springframework.boot</groupId>
		<artifactId>spring-boot-starter-parent</artifactId>
		<version>1.5.3.RELEASE</version>
		<relativePath/> <!-- lookup parent from repository -->
	</parent>

	<properties>
		<project.build.sourceEncoding>UTF-8</project.build.sourceEncoding>
		<project.reporting.outputEncoding>UTF-8</project.reporting.outputEncoding>
		<java.version>1.8</java.version>
	</properties>

	<dependencies><!-- 起步依赖 -->
		<dependency>
			<groupId>org.springframework.boot</groupId>
			<artifactId>spring-boot-starter-aop</artifactId>
		</dependency>

		<!--web及模板引擎-->
		<dependency>
			<groupId>org.springframework.boot</groupId>
			<artifactId>spring-boot-starter-thymeleaf</artifactId>
		</dependency>
		<dependency>
			<groupId>org.springframework.boot</groupId>
			<artifactId>spring-boot-starter-web</artifactId>
		</dependency>

		<!--数据库-->
		<dependency>
			<groupId>mysql</groupId>
			<artifactId>mysql-connector-java</artifactId>
			<scope>runtime</scope>
		</dependency>
		<dependency>
			<groupId>org.springframework.boot</groupId>
			<artifactId>spring-boot-starter-jdbc</artifactId>
		</dependency>
		<dependency>
			<groupId>org.mybatis.spring.boot</groupId>
			<artifactId>mybatis-spring-boot-starter</artifactId>
			<version>1.3.0</version>
		</dependency>

		<!--测试-->
		<dependency>
			<groupId>org.springframework.boot</groupId>
			<artifactId>spring-boot-starter-test</artifactId>
			<scope>test</scope>
		</dependency>
	</dependencies>

	<build><!-- 运行spring boot插件 -->
		<plugins>
			<plugin>
				<groupId>org.springframework.boot</groupId>
				<artifactId>spring-boot-maven-plugin</artifactId>
			</plugin>
		</plugins>
	</build>

</project>
- 其中Artifact ID为spring-boot-starter-xxx的都是spring boot起步依赖;
- 构建插件的主要功能是把项目打包成一个可执行的超级JAR(uber-JAR),包括把应用程序的所有依赖打入JAR文件内,并为JAR添加一个描述文件,其中的内容能让你用java -jar来运行应用程序;
- Maven构建说明中还将spring-boot-starter-parent作为上一级,这样一来就能利用Maven的依赖管理功能,继承很多常用库的依赖版本,在你声明依赖时就不用再去指定版本号了。